There is an innumerable amount of articles and tutorials teaching parts and pieces of retouching portraits. However, finding the ones with quality techniques and information can take days. Furthermore, there is no singular tutorial that teaches a complete set of methods to retouch portraits free of charge. Finding the right tutorials for each aspect of editing can become very time consuming. This article contains 5 years of research for achieving the greatest methods to retouch a portrait.
Before diving into the material of the article, it is important to note that the quickest, most efficient way to gain the knowledge on retouching is probably one of the paid tutorials. For beauty and studio photographers, Michael Woloszynowicz has the perfect tutorial on high-end retouching. He is not only gifted with his photography and retouching, but also in delivering over information in a clear and concise manner. Anyone on any level can understand the information. For portrait photographers interested in learning a quick and easy way to retouch portraits, while also making them pop, I released a tutorial a few months ago with RGGEDU. In this tutorial I take you on 9 portrait sessions in different locations using natural light only and I share my entire post processing workflow for each shoot. Additionally I include my action that allows you to knock out edits within 15 minutes.
Another quick thing I'd like to point out is the false concept that "it's all about the editing". IT'S NOT. Editing an image will only take a great photo over the edge. It will not change a bad photo into an excellent photo. The purpose of the methods I'm about to share is not to change the photos, rather to enhance it.


Culling
Culling images is simple. The importance of it is often overlooked. Even with the best retouching methods, if the right photo to edit wasn’t chosen, the results won’t be exciting or pleasing to the eye. Choosing 3-5 images out of 500 from a photoshoot is hard. In fact, it’s an art-form. I’ve found the best way to narrow it down is to select 35 images and then show it to friends and family and let their instincts help you.
Another important thing to remember is that it is always best to go with the more natural poses. While creativity is important, it is equally important to not overdo things and try too hard.
There is no technique to culling. It is all about finding an image that is pleasing to the human eye. And that is what makes it the most difficult because there is a tremendous amount of subjectivity involved. That is why it is best to share it with as many people as you can. Forget about a technically perfect image. Find an image that speaks to you and your friends. For more on this, check out the following article: A Technically Perfect Photo is Meaningless
To cull images:
Open adobe bridge - navigate to the folder with images - hit the space bar and use the arrow keys to navigate - hit any number between 1 -5 to rate the image - hit the space bar again and then press enter (this opens the image in CameraRaw or Photoshop).

Camera Raw
People often confuse Camera Raw as the place where special effects and filter adjustments are made. However, CR helps create a foundation for which to continue editing on Photoshop. CR is not where amazing results happen. It’s used to make RAW adjustments like, bringing back some detail in the highlights, adjusting the white balance.
With that in mind, it is important to avoid making global adjustments like using the exposure and contrast slider. Adding contrast is something that can be done manually in the editing process, if you add contrast in CR you will notice toning issues on the skin and eyes becoming dark and unrecoverable. If there is something small that is bothersome, for example the skin is on the darker side, there are methods to brightening that without using the exposure slider which over brightens the background in the process. Hit up the luminosity slider, the orange and red slider can be used to brighten the skin and leave everything else alone. Clarity is frowned upon but about 10 usually makes the image pop and makes dodging and burning easier. It will make flaws such as pimples stand out more but that's ok since you will spot heal that later anyways.
Photoshop
Spot Healing
This tutorial shows you how to spot heal blemishes in the skin, you can use this for stray hairs on the skin as well. DO NOT take his advice on using the patch tool for the bags under eyes. This is a huge nono since you mess with the textures. I will explain under the next section of this article how to fix bags.
https://www.youtube.com/watch?v=zJ_B9bbEe7M
Frequency Separation
The purpose of frequency separation is to fix mismatched skin tones. Here's a tutorial that explains it. If you find this method to be lengthy and you're loosing patience jump to the next video that will teach you a more simple method to fixing skin tone issues.
If the above video is too advanced and lengthy, check out this method I figured out to fixing mismatched skin tones. This is how you would get rid of bags under the eyes:
Once we are on the subject of fixing skin tones problems make sure to watch the following 2 videos on getting rid of redness in skin
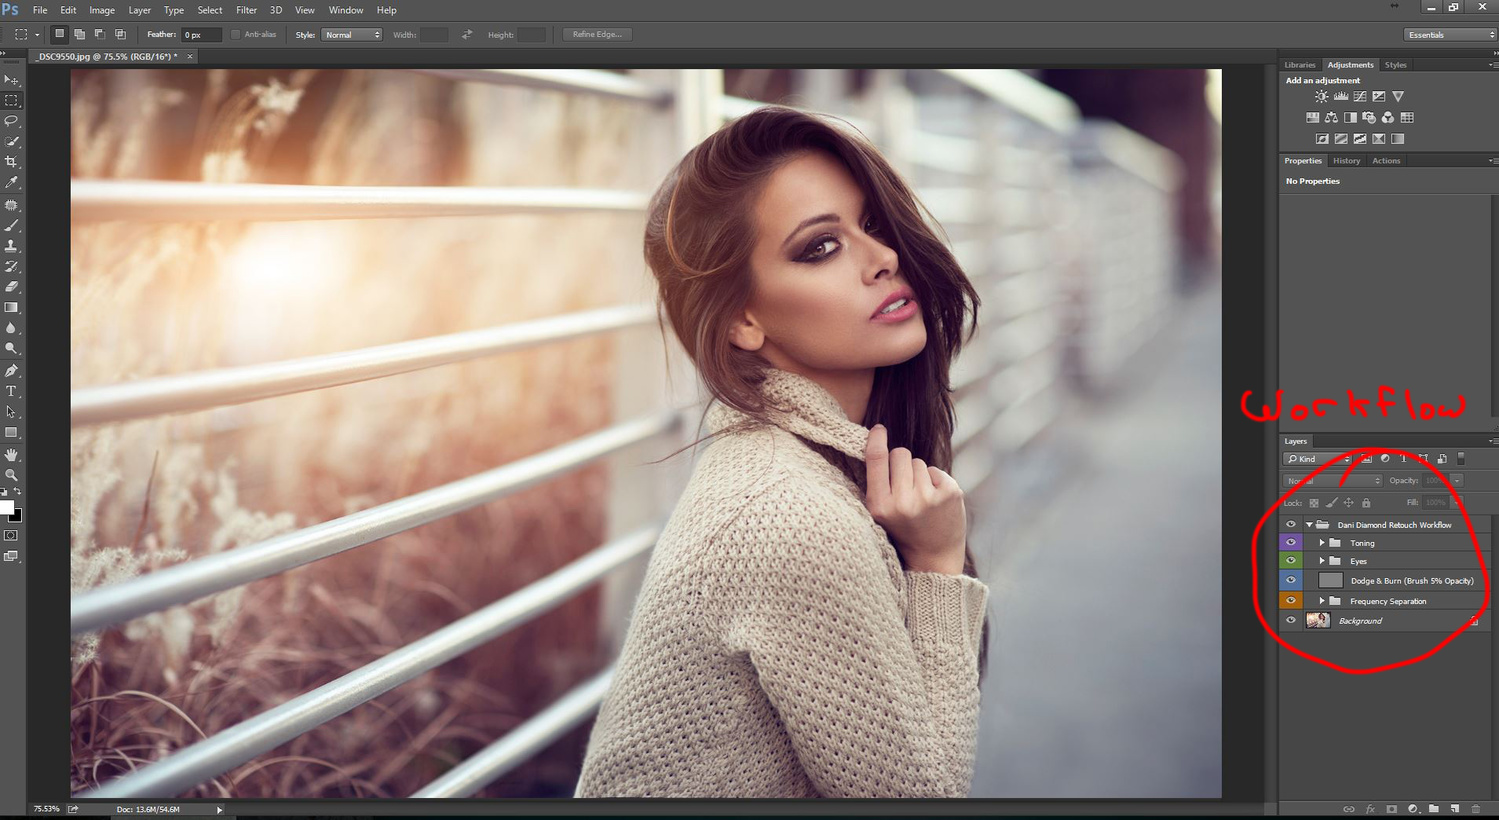
Dodge & Burn
Dodging and burning is probably the most important part of your workflow. It's the hardest to master but also the most rewarding. Before clicking on the following video understanding where to dodge and burn is most important. The tools and methods you use to dodge and burn is simple and actually isn't important. Understanding where and how much to dodge and burn is the key to success here. Check out this article I wrote last year that will help clarify where to dodge and burn "A Makeup Tip I Wish Someone Had Told Me When I Started Photography"
Again, there are dozens of ways to dodging and burning, so don't get hung up on the tools to use. Concentrate on understanding where to do it and how much. Just follow the techniques used by makeup artists. They understand this best. I keep it simple by using a new layer set to soft light and filled with 50% grey. Then use a brush set to 5% opacity and brush white to dodge and a black brush to burn. This is a method I saw in Scott Kelbey's book called Light it, Shoot it, Retouch it.
Eyes
I've already written the perfect article that will help you make eyes pop and still look natural. "Understanding the Human Eye and How To Retouch it Naturally" I searched high and low for a YouTube tutorial on retouching eyes and haven't found one. Everything I've come across is ridiculous methods with completely overdone results.
To sharpen the eyes duplicate the layer, go to Filter > Other > High Pass, set it to 30. Then set layer Blend mode to Soft Light. Add a black mask. Use a white brush at 50% opacity and brush the eyes. Make sure you're mask is selected when you're painting.
Toning
Before you move on take note: If you aren't happy with you image at this point then the toning portion will not change how you feel about the image. The toning will never completely change a photo and a lot of people out there blame their lack of post production skill on the toning portion. Toning will only add a little bit to an already solid image. Before we jump into toning the key thing to keep in mind is toning is not about throwing on random colors and filters. this might work one out of 20x. if you want to nailing the toning portion you need to have a clear understanding for complementary colors. This goes beyond toning though. Its critical to keep this in mind when picking wardrobe and location.
Here's a video that shows the power of complimentary colors.
Resizing and Saving
My friend Nino Batista wrote an amazing article on resizing images for social media worth reading. Personally I resize the image to 2100px on the long edge using Photoshops Image Size (CTr+ALT+I).
I hope you found this article helpful. I'm all about sharing and helping others. Please consider sharing this article and helping fellow photographers as well.
If you'd like to take your photo editing to a new level, make sure to check out the variety of Photoshop tutorials and plugins that will speed up your workflow and help you create stunning, professional work. Save 15% by using "ARTICLE" at checkout.







Seen some of these, many are new to me. Thanks for compiling this, I look forward to going thru them.
Nice job, Dani! :) Thank you!
Great job Dani. You're an amazing artist and an inspiration. Thank you!
Thank you for sharing this Dani, I have been following you for a while now and I really like your work!
Wow, just as epic as you'd promised! Thanks a lot Dani. Like many, been following you for a while now and am forging my growth from your style of work. (If I wanted to be the best basketball player, I'd copy Michael Jordan's shot, right? Haha). A few Natural Light Portraits on my page if you want to take a look.
1000 thank you's Dani! You are the man! Very much appreciated.
This is a great compilation of all the "greatest hits" - I think if you have a strong picture to start with these will definitely help push it to an even better place...thanks!
Thanks for sharing Dani
Thank you much. Some of these I learned a while ago but I have a very bad memory so it was refreshing while others I took notes and will be using them more in my workflow. Good stuff!
Many thanks, Dani. All the work you put into disseminating good information is much appreciated!
Great Job
Epic post. Thanks Dani
Nice collection!
thanks Dani, this is great!!
Thank you so much for all you do for the photography community. This is excellent information. I would love to meet you someday!! :) :)
Looking forward to setting aside some time to go through these. Thanks so much for putting it all together and sharing Dani!
Dani, You're awesome... So many people don't believe in sharing! You are an example to follow! Thanks Dani!
Hi Dani, amazing content as always, i got a quick question:
On the last step you say to resize the file using image size (ctrl+alt+I), i personally just save with save for web (ctrl+alt+shift+s), so that i resize and choose export quality all at once, and keep the original PSD at maximum resolution, in case I need to work on it again, say, to print it for an exposition or anything.
Thing is do you think it makes any difference or is it about your personal workflow? I feel like resizing and then exporting are two steps that can be made one
I think it depends on image content and how much you resize it. Sometimes I'm using post-resize sharpening just on some parts of the image, sometimes amount of this sharpening differs, etc.
I am excited to read through this Dani!!!
Excellent Information, however I wish the videos for Color Grading dealt more with portraits and not the cinema look. Thanks for sharing!
You have sent me on a tailspin of re-edits! Thank you for this. I can't wait to see what I can do with all of this wonderful info.
Just as impressive as your article is that you take the time to respond to people's comments. A true class act!
thank you for this post. One of the very few articles in Fstoppers that's worth reading and is not just a copy-paste information from other blogs/articles.
This one actually helps your followers unlike your other colleagues who just post crap in this website.
Amazing Dani ! Great write up, and very generous of you to share.
Thanks.
Thanks for the post
Wow, great compilation! :)
Thanks Dani, for putting it together. Until now I had the bits and pieces, but the comprehensive look on it is an interesting read!